Electronic mail is a popular communication medium to send text, images, videos, and files to hundreds and thousands of people around the world. And as pythoneers ourselves, we may come across the question, can we send emails using python ?.
So in this video, I am going to show exactly how you can programmatically send emails in python. If you are into python like me, you can join our community “All about python” by
- subscribing on YouTube
- following on Instagram or
- joining our newsletter through our blog site allaboutpython.tech.
Getting Started
The task of sending emails in python can be achieved using a few libraries, if you want to send a simple text mail, without any HTML content or image, you can just use the smtplib package. But if you want to send emails with HTML content or images, you can use the email package along with smtplib.
For this demo, we will use both smtplib and email packages to send mail. We will discuss two scripts, html mail.py, and text mail.py, each having code using and without using email packages respectively.
Setting up account
For all the viewers following this tutorial for learning, I would recommend using an outlook account to send mail rather than a Gmail account because of two reasons.
- Unlike Gmail accounts, you don’t need to specify a phone number to create the account.
- With the updated Gmail settings, it's much more difficult to send mail from a Gmail account, compared to sending mail from an outlook account.
I have already created a sample outlook account that will send mail to the allaboutpython channel’s official mail ID using the python script. With the setup instructions clear, let’s start writing some code.
Sending text mail
I will start by creating a file and naming it “text_mail.py”. Within the file, I will first import all the required modules.
- We will import getpass to get the outlook account password from the user using the console.
- We will import smtplib to send emails through the mail server.
Next, we will create a few variables.
- Create a variable named HOST with the value “smtp-mail.outlook.com”. This is the SMTP server domain name of outlook. If you are using another provider like Gmail or yahoo, then you would need to change this value. You can view the list of providers and their associated SMTP server domain names.
HOST = "smtp-mail.outlook.com"
- Create a variable named PORT with value 587. This is the port at which we will connect to the SMTP server. Most of the servers use port 587 for SMTP, but you can view in this list which providers use the alternate 465 port.
PORT = 587
- Create a variable named FROM_EMAIL with the value “allaboutpythontestacc2@outlook.com”. This the test email account I am using to send the mail. You can change this value with the email ID of the account you are using.
FROM_EMAIL = "allaboutpythontestacc2@outlook.com"
- Create a variable named TO_EMAIL with the value “allaboutpythoninfo@gmail.com”. This is the allaboutpython channel’s official email ID. We will send our test email to this ID. You can change this email id to send mail to another ID.
TO_EMAIL = "allaboutpythoninfo@gmail.com"
- Create a variable named password and get its value from getpass.getpass() function. Within this function, we will pass a string value. The function will print the prompt message that we have passed here and will take the password from the user. The password will not be visible on the console, but will be entered and understood by the program, and saved inside the password variable.
PASSWORD = getpass.getpass("Enter password: ")- Create a variable named message which will contain the message we need to send through the mail. Now there’s a specific format you need to set to send the message. The first line of the message should start with the Subject: followed by the subject of the mail you want to set. From the next line, you can write the body of the message in plain text.
MESSAGE = """Subject: Mail sent using pythonHi allaboutpython,
This email is sent using a test account.
Thanks,Test Account"""
With all the variables created, let’s start a connection to the server.
We will create a variable named smtp which will store an object of smtplib.SMTP class. The class will take two required parameters, the host and the port, which we have already created above.
smtp = smtplib.SMTP(HOST, PORT)Next, we will call the ehlo method of SMTP object. This function will ping the server and check if the server is up and running or not. This function will return a tuple containing the status code of the response and the response message received from the server. We will also add a print statement just to view how the response looks.
status_code, response = smtp.ehlo()
print(f"[*] Echoing the server: {status_code} {response}")
Next, we will call the smtp.starttls function. This function will establish a TLS connection between our system and the server. This is especially important to perform if you want to send your emails securely over the internet. This function will also return a tuple containing the status code and the response message. We will again add a print statement just to view the response.
status_code, response = smtp.starttls()
print(f"[*] Starting TLS connection: {status_code} {response}")
Next, we will log in to the server using our account’s email ID and password. We will call the smtp.login() function and pass the email ID and password here. Just like the previous functions, this function will also return a tuple containing a status code and a response message. We will again add a print statement to view the response.
status_code, response = smtp.login(FROM_EMAIL, PASSWORD)
print(f"[*] Logging in: {status_code} {response}")
After successful login, we can send our mail using smtp.sendmail function, The function will take in two parameters from email, to email and the message.
smtp.sendmail(FROM_EMAIL, TO_EMAIL, MESSAGE)Finally, to close the connection with the server, we will call the smtp.quit() function.
smtp.quit()Here's the full script
import smtplib
import getpass

HOST = "smtp-mail.outlook.com"
PORT = 587

FROM_EMAIL = "allaboutpythontestacc2@outlook.com"
TO_EMAIL = "allaboutpythoninfo@gmail.com"
PASSWORD = getpass.getpass("Enter password: ")

MESSAGE = """Subject: Mail sent using python
Hi allaboutpython,

This email is sent using a test account.

Thanks,
Test Account"""

smtp = smtplib.SMTP(HOST, PORT)

status_code, response = smtp.ehlo()
print(f"[*] Echoing the server: {status_code} {response}")

status_code, response = smtp.starttls()
print(f"[*] Starting TLS connection: {status_code} {response}")

status_code, response = smtp.login(FROM_EMAIL, PASSWORD)
print(f"[*] Logging in: {status_code} {response}")

smtp.sendmail(FROM_EMAIL, TO_EMAIL, MESSAGE)
smtp.quit()
Now let’s run the script and see how it works.

As you can see, the script first asked me for the password, which I entered here. Next, it echoed the server and displayed its information. Next, it displayed the information on starting a TLS connection. And finally, it displayed the information on logging on to the server. You can add more print statements to view more information if you like.

Now if I open the allaboutpython Gmail account, you can see that we have received mail from our test account. On opening the mail, we can see the subject we wrote here and the message we wrote here. This is how you can send a simple text mail.
Sending mail with HTML content
For the next step, we will create a script capable of sending html content by mail using the email package.
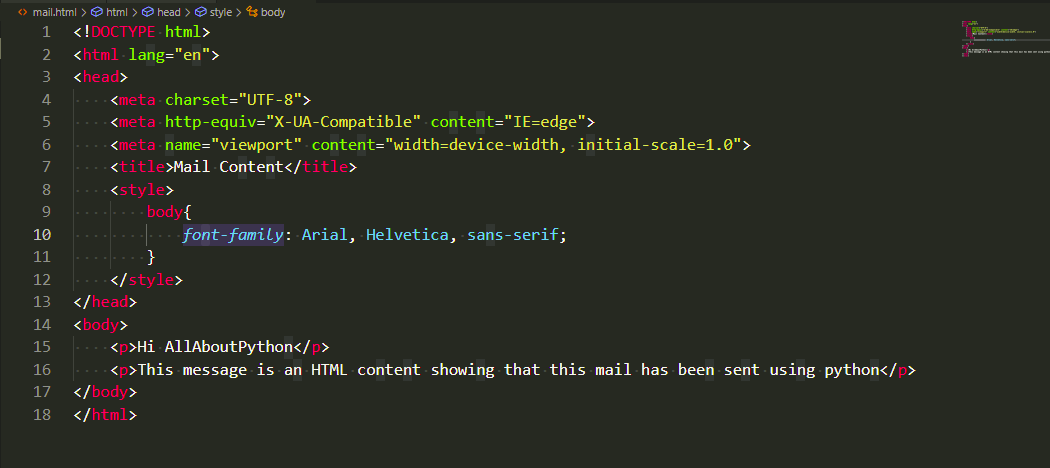
We will start by creating a new python file and naming it html_mail.py. We will also create a mail.html file that will store the HTML mail we want to send. For this, we will use a simple html file with all the necessary tags like html, head, body, etc. and we will add two paragraph tags and write a simple message here. If you want, you can add more content and css here to make it more attractive.
Within the html_mail.py file, we will start by importing the packages. The getpass and smtplib packages will remain the same, but we will also import two modules in the email package, namely MIMEMultipart, and MIMEText. MIMEMultipart is used to create the email message object and MIMEText is used to add html content to the mail.
import smtplib
import getpass

from email.mime.multipart import MIMEMultipart
from email.mime.text import MIMEText
Just like the previous script, we will create a few variables like host, port, from_email, to_email, and password. You can change these values according to your needs.
HOST = "smtp-mail.outlook.com"
PORT = 587

FROM_EMAIL = "allaboutpythontestacc2@outlook.com"
TO_EMAIL = "allaboutpythoninfo@gmail.com"
PASSWORD = getpass.getpass("Enter password: ")
Next, we will create a variable by the name message which will contain the object of class MIMEMultipart. We will pass in a string parameter with the value ‘alternative’, which refers to mime type mime/alternative.
message = MIMEMultipart("alternative")
Within the message object, we will set some data regarding the mail like subject, from, to, cc, bcc, etc. For this, we will treat this object like a dictionary, and add key-value pairs to it. Here I have specified the subject of the mail, the email address, the email address, the email addresses to be added in cc, and finally the email addresses to be added in bcc.
message['Subject'] = "Mail sent using python" message['From'] = FROM_EMAIL message['To'] = TO_EMAIL message['Cc'] = FROM_EMAIL message['Bcc'] = FROM_EMAIL
Next, we have written a block of code to just read the HTML content that we have saved inside the mail.html file. We will save the content within the HTML variable.
html = ""
with open("mail.html", "r") as file:
    html = file.read()
Next, we will create a new variable html_part and store the object of class MIMEText in it. MIMEText class is used to convert plaintext content into the correct format based on the mime type passed onto it. In this case, we are passing the HTML content here and specifying the mime type as HTML.
html_part = MIMEText(html, 'html')Once the html part is ready, we will simply attach the HTML content to the message by writing a message.attach html_part.
message.attach(html_part)
The rest of the code remains similar to the one we had written in the previous python script. We create an SMTP class object, echo the server, start this connection, login using account details, send the mail, and then quit. The one thing that has changed is the send mail code.
smtp = smtplib.SMTP(HOST, PORT)

status_code, response = smtp.ehlo()
print(f"[*] Echoing the server: {status_code} {response}")

status_code, response = smtp.starttls()
print(f"[*] Starting TLS connection: {status_code} {response}")

status_code, response = smtp.login(FROM_EMAIL, PASSWORD)
print(f"[*] Logging in: {status_code} {response}")

smtp.sendmail(FROM_EMAIL, TO_EMAIL, message.as_string())
smtp.quit()
In this line, we previously just passed the message in plain text. But since we are using the MIMEMultipart class object, we will call the as_string function to get a plain text string format of the mail, which we will pass to the send mail function.
Let’s save and run this script to see how it works.

As you can see, we got a console message similar to the previous one, but if we check the email content, we can see that the message now has the HTML content which we write within the mail.html file.

With this, we end today’s tutorial, hope you liked it.
If you did, don’t forget to join our newsletter and subscribe to our YouTube channel.

If you have any queries, please let me know